Showing posts with label cold process. Show all posts

Tuesday, December 15, 2015

Candy Cane Taiwan Swirl


Happy holidays, everyone!

I hope you all are gearing up for a wonderful time with your loved ones. My husband and I are going home to Florida for Christmas and we're looking forward to spending time with family and friends. I am especially looking forward to being declared the loser of our annual Goofy Golf putt-putt game. It's tradition.

It's also tradition for me to give family and friends the gift of soap whether they want it or not. Just kidding, they all want it. Who wouldn't?

And it just wouldn't be the holidays without peppermint and candy canes.

I usually make a candy cane soap every year, and I try to come up with a different way to do it each time, too. This year, I decided to try the Taiwan Swirl.  You may remember that I attempted a Taiwan swirled candy cane soap last year and things didn't quite work out. But this year things went more according to plan.

For starters, my recipe behaved this time. I used the same recipe that I used for my Pumpkin Gingerbread Vertical Swirl: 50% olive oil, 30% coconut oil, 15% avocado oil, and 5% castor oil with a 5% superfat factored in. Both times I have used this recipe, it traced slowly for me. I had been having difficulty finding a palm-free recipe that creates a loose, thin trace, which is what is needed for something like the Taiwan Swirl. In fact, I had to stickblend the soap batter for quite a while to get to a light trace. I have been trying for months to rid myself of my tendency to overmix, so it feels strange to stickblend and stickblend and stickblend ... and stickblend some more.

The downside of this recipe is that it makes quite a soft soap initially. It needs to hang out in the mold for a little extra time. Even then, I think I may make it a habit to put my mold in the freezer for a few hours before unmolding when using this recipe to ensure a clean removal. Looking back, I was probably very lucky that the soap didn't tear when I unmolded it.

For the liquid, I swapped coconut milk for the water just because I had several baggies of it in my freezer and thought that it would be a nice addition. I cook with coconut milk frequently and often have some left over from a recipe. So I just measure it out, pour it in a baggie, write the weight on the bag, and put it in the freezer. If I don't use the leftover in a future culinary adventure, it goes into a batch of soap.

It's good to freeze milks anyway before using them in soap because if the milk gets too hot it can scorch. When you add the lye, it will melt the frozen milk. I also stir the lye solution in an ice bath to keep the temps as low as possible.

My fragrance cabinet is running low on holiday scents, but I did have some peppermint and spearmint essential oils. Yay, since I wanted to make a candy cane soap.

For the colorants, I opted for titanium dioxide, Merlot Sparkle mica, and Hydrated Chrome Green pigment mixed with a bit of oil pulled from the total to work out the clumps.

To do the Taiwan Swirl, I had the help of some awesome dividers from Great Soap Shop on Etsy. These dividers fit the RED Essential Depot silicone mold, but Great Soap Shop also offers similar dividers that fit the Crafter's Choice 1501, Bramble Berry 10" silicone molds, and American Soap Supply Tall & Skinny molds. (RED stands for "Revolutionary Essential Depot," if you were wondering.)

Here is a video showing what I did:


I mixed my essential oils into my soapmaking oils and then added the coconut milk/lye solution. I brought the soap to a light trace. Then I split my batch into four portions.

Because I am dreadful at eyeballing things, I broke out the calculator to help me figure out how much soap I needed for each cavity of my divider. A nice feature of SoapCalc is that it will estimate your soap's total weight. For this batch, my total weight was approximately 1,980 grams. So I divided that number by four to get 495g, which is how much I would need for each cavity. I wanted to do a white-red-green-white pattern, so I figured I needed 495g of red, 495g of green, and the rest could be white.

I pressed down on the dividers as I poured the soap so that it wouldn't leak over onto the other side. It's probably best to have a buddy simultaneously pour two colors while you pour the other two to keep the soap from leaking underneath the dividers. I was alone, though, so I pressed down as I poured some white into one cavity, then some red into another, some green into another, and more white in another. I did pretty well with minimal leaking, and once I had some soap in each cavity the soap didn't migrate anymore.

Once I had poured all of my soap, I carefully pulled the dividers straight up and out. There was soap still clinging to the dividers, so I grabbed a silicone mold with individual cavities and scraped the soap into it.

To do the swirl, I stuck a candy thermometer (a chopstick or something similar would also work) to the bottom of the mold and made a tight S-pattern vertically through the soap. Then I made a similar pattern through the soap horizontally as well.

The cut for the Taiwan Swirl is a little different than what I normally do for a loaf soap. Instead of cutting the bars every inch or so, I cut the soap into roughly two-and-half-inch blocks and then cut those blocks in half horizontally. (The cutting starts at about the 11:55 point in the video above if you want to skip to it to see what I mean.)  The swirls run through the entire loaf, so by cutting horizontally, the swirls will cover more of each soap bar's surface. I used a finished bar from another batch to help me determine where to cut.

The top of my soap loaf had a bit of soda ash, but I steamed it away.

I really love these bars, and I think my family and friends will, too! And I am so thrilled that I FINALLY managed to achieve a trace light enough to allow me to swirl.

What are your plans for the holidays? I hope that you all have a wonderful holiday season and a happy New Year!

Friday, November 20, 2015

Pumpkin Gingerbread Vertical Swirl


It is autumn, which means that it is time for pumpkin-flavored and pumpkin-scented everythings.

I love pumpkin season. Mostly because of the eating of the pumpkins. Pumpkin pie, pumpkin cookies, pumpkin bagels, pumpkin cupcakes, pumpkin lattes.

Pumpkin soup.

But also pumpkin soap.

Here is my contribution to Pumpkin Mania: a pumpkin-gingerbread swirl soap.

I knew that I wanted to make a pumpkin-themed soap. I went to my fragrance cabinet to see what was there and I discovered that I had an ounce of Bramble Berry's Pumpkin Pie Cybilla fragrance oil, which it appears they no longer carry. (It had been hanging around for a few years and I forgot that I had it.)

The Pumpkin Pie fragrance oil would most likely discolor brown, though, due to the vanilla content. I didn't want a brown soap. So I wondered, how can I make the brown work to my advantage?

That's when I decided to combine it with a Gingersnap fragrance oil. My plan was to make half of the soap orange and unscented, and the other half scented with both the Pumpkin Pie and Gingersnap fragrance oils. The unscented half would stay orange, and the scented half would turn brown. I suppose that I could have used just the Pumpkin Pie fragrance oil, but a) I didn't have enough of it for the whole batch, and b) the Gingersnap fragrance makes the brown color make more sense (or scents?), at least in my mind anyway.

I'm calling it Gingerbread, though. Just cuz I wanna.

Next I had to decide on a design. I remembered this tutorial from the Soap Queen blog using Bramble Berry's vertical mold to make a half-circle design in the soap.

The idea is to pour one color into each side of the vertical mold. Then you lift the divider out just enough to get it out of its groove, twist it 180 degrees, and then carefully pull the divider all of the way out. It is supposed to make half-circle designs on each side of the soap; in this case, orange soap with a brown half-circle on one side, and brown soap with an orange half-circle on the other.

Here's a video of me making this soap:


My design didn't turn out as crisp as I would have liked, but it is still a neat look. I think I just need more practice.

For this project, I went with 50% olive oil, 30% coconut oil, 15% avocado oil, and 5% castor oil with a 5% superfat figured into the recipe. It seemed to trace slowly for me. I wanted the trace to be at about medium to help the design stay crisper, so I had to stickblend for quite a while, which is something I usually have to stop myself from doing.

Before adding the lye solution, I stickblended three ounces (84 grams) of pumpkin puree into my oils to get it really well incorporated. ( I also subtracted three ounces of water from the recipe to make up for the water content of the pumpkin.) Then I added the lye solution and brought the soap to trace. I split the batch in half and colored one half with orange mica, mixed with a bit of oil pulled from the total to work out the clumps. I added all of the fragrance oil to the other half and left it uncolored since the fragrance oil would turn it brown. The scented half got a little thick with all of that fragrance oil in it, but it was manageable. The unscented orange half stayed pretty loose.

Then I poured the orange soap into one side of the mold and the scented soap into the other side. I like to pour the two halves simultaneously to keep the divider from coming loose and sliding around. After pouring, I twisted the divider as described above.

While this recipe has a nice slow trace, it does make a soft soap initially. I left it in the mold for a long time - about two weeks - which is probably much longer than I needed to. I'm just lazy. But it probably does need to sit a little longer before cutting to let some water evaporate and allow the soap to firm up a bit.

I had some trouble getting the plastic liners to come away from the soap because it was so soft, but I was able to remove them after putting the soap in the freezer for a few hours. Then I let the soap sit for a couple more days before cutting. When I did finally cut it, it cut well and didn't seem especially soft anymore.

I've tested an end piece and some of the leftover soap and it is very nice! It feels great on the skin and smells delicious.

And the soap pairs nicely with my pumpkin-scented body lotion. Always have to buy some of that this time of year!

Oh, and what to do with any leftover pumpkin puree? Pumpkin Blondies! (I just swapped pumpkin for the sweet potato.)

Are you a pumpkin fan? If so, what is your favorite way to incorporate pumpkin into your projects?

Thursday, April 2, 2015

Chocolate Patchouli Soap


Hear me out now.

Chocolate and patchouli are really good together, you guys.

What made me combine the two?

Well, my husband kinda gave me the idea. There was a bar of Geranium Patchouli soap in the bathroom. After he showered, he smelled faintly of patchouli. Then he put on some cocoa butter lotion. And I remarked that he smelled like chocolate and patchouli.

You can guess what happened next.

Off to my fragrance stash, where I knew I had some patchouli essential oil. But did I have anything chocolate-y?

Why, yes, I did. Bramble Berry's Chocolate Espresso Cybilla FO. Funny, I don't pick up any of the coffee notes in this scent. It just smells like chocolate to me. A Tootsie Roll, to be exact. Which worked out great for this soap.

For the fragrance ratio, I used the Chocolate Espresso at a 3:1 rate with the patchouli EO. So, for two pounds of oils, I used 1.5 ounces of the Chocolate Espresso and .5 ounces of patchouli. Looking back, I think I might enjoy a 1:1 ratio better. I was afraid to use too much patchouli because it is such a strong scent and I worried that it would overpower the chocolate. But the chocolate is pretty strong, too, and I mostly smell chocolate in the finished bars, although it seems that the patchouli blooms a bit when the soap is used.

The recipe is based on a Soap Queen guest post called "Sea Clay Avocado Facial Bar" written by Amanda at Lovin' Soap. I didn't use any sea clay, though, and I did swap out canola oil for the olive oil because gawd have you seen how much olive oil costs lately? And of course, I ran the recipe through a lye calculator after making the substitution.

Amanda's recipe includes a good amount of cocoa butter, which goes with the chocolate theme nicely. And I also colored the soap with a bit of cocoa powder at a rate of 1 teaspoon per pound of oil. So, I used 2 teaspoons total here and mixed the cocoa powder with a couple of Tablespoons of oil pulled from the total. I tested an end piece and the soap lathers white, so I think that is probably an okay amount to use. The Chocolate Espresso contains vanilla and discolors the soap brown anyway, but I thought that the cocoa powder would work nicely with the theme as well.

And speaking of cocoa butter, here's a "grate" tip I heard (I can't remember where) for making it easier to work with - use a cheese grater! Take those big chunks of rock-hard cocoa butter and grate them down into manageable shreds. Grate a whole bunch and store it in an airtight container. The cocoa butter shreds are easier to measure and they melt faster, too.


For this batch, I decided to make some gold mica lines, which I thought would look striking against the dark brown color of the soap. I poured about one-third of my batter into my mold and then propped the mold up at an angle with a couple of packs of playing cards. Then I spooned a bit of gold mica into a tea strainer and gently tapped out a light layer of mica onto the surface of the soap. It is important to just cover the surface and to not be heavy-handed - too much mica can make your layers separate.

After I made the first mica line, the plan was to spoon some more soap on top (being very careful not to disturb the mica line) and then tilt the mold the other way to make a line slanting the other direction. I opted to just leave the mold level, though, and to do a straight line, mostly because the soap batter was pretty thick at that point and not very fluid. So I made my second mica line, spooned the rest of the soap on top of it, and then finished it off by sprinkling a bit more gold mica and texturing the tops.

Then I insulated the mold with a towel and set it aside to let it gel. I admit that I have been known to peek at the soap during this stage. I'm glad I looked because the soap heated up pretty quickly and even started to crack a bit on top. So once the soap was in full gel phase, I removed the towel and the cover. Another reason I'm glad I peeked is because it allowed me to photograph the soap about halfway through gel phase. See how it's darker in the middle? The heat radiates from the center outward toward the edges, which is why your soap may get a dark circle in the middle if it only partially gels.

If you look closely, you can see droplets of moisture forming on top of the soap.

The soap developed some moisture on top, but the liquid wasn't zappy at all. I suspect that it was either fragrance oil or condensation from a very hot gel phase.  I let it sit for several days and the soap reabsorbed most of the liquid. When I went to unmold, the sides were a bit wet, too, but, again, it wasn't zappy, so I just blotted the loaf dry with a paper towel.

Here's a video of the making of this soap:


To the cut the soap, I laid the loaf on its side. Cutting from top-to-bottom can drag your mica line through the bar - cutting the soap on its side minimizes dragging and helps keep your mica lines cleaner.

I am very happy with how these bars turned out, and they smell so good. It was difficult not to lick the bowl while I was making this soap - it looked and smelled just like chocolate cake batter.

What are some of your favorite chocolate scent combinations?

Sunday, February 22, 2015

Bedtime Bath Salt Bars

Can you believe that it has been four months since I made a batch of soap?

I made my Christmas Tree Feather Swirl soap in late September and that was it for 2014. My husband and I had a cross-country move looming and I was busy with a million things getting ready for it. Plus I didn't want to haul a bunch of uncured soap two thousand miles.

By late January, we were settled enough in our new home for me to start thinking about making soap again. After such a long hiatus, I was worried that I wouldn't remember how to make soap. So I chose something simple by design and also out of necessity. I was out of almost all of my oils, as I had used most of them up and didn't want to buy more until after we moved. But I did have some coconut oil left, and two pounds of pink Himalayan sea salt.

You know what that means.

SALT BARS!

(You may remember that I adore salt bars. Hubby likes them, too. You can see previous batches that I've made here. And here.)

I did drag some fragrance oils with us on our road trip. And a bottle of lavender FO leaked all over the place. BUT the car smelled lovely. And lavender is known to be calming, and it is important to stay calm while driving.

One of the scents that made the cut was Element's Bedtime Bath fragrance oil, which also happens to feature lavender - along with chamomile - and it smells like a popular brand of baby lotion.

Salt soap batter gets thick pretty fast once the salt is added, so swirls and other intricate designs are just about impossible. So I decided to do a two-layer soap.

For this batch of salt soap, I used 100% coconut oil. Salt is a lather-killer, so a large percentage of coconut oil is necessary to restore the lather. In fact, coconut oil lathers well in salt water, unlike other oils. And because coconut oil can be drying in high amounts, I included a high superfat of 20% to make the soap more nourishing.

My recipe called for 32 ounces of oils. I decided to use the salt at a 1:1 oil:salt ratio, meaning that I used equal amounts of oil and salt. So for 32 ounces of oil, I used 32 ounces of salt.

The colors that came to mind for this baby lotion-type fragrance were pink and purple, probably due to marketing influences. I brought the soap to trace and then split it in to two equal portions. One portion I colored with ultramarine pink, the other with ultramarine violet.

Next I added 16 ounces of pink Himalayan salt to each portion. Then I poured the purple layer into my acrylic slab mold, smoothed it out, and then carefully poured the pink layer on top of it. Once both layers were poured, I inserted the dividers and let the soap gel.

A few days later, I unmolded the bars. Salt bars get hard really fast, so I could have unmolded much sooner. I just didn't get around to it right away. I especially like using my slab mold with dividers for salt bars because it takes all of the guesswork out of when to cut the soap. Salt soap needs to be cut at just the right time. Wait too long and you get a crumbly mess. With the dividers, I don't have to worry about cutting. And because salt bars are so hard, unmolding was a breeze.

Here's a videoooooooooo!


I'm glad that I've got a new batch of salt bars made and curing! We'll be set for a while now. And with such a fresh, soothing scent, we'll smell like clean, happy babies!

Saturday, December 13, 2014

Christmas Tree Feather Swirl

Seasons greetings, everyone!

I hope that you all are gearing up for a wonderful holiday season with family and friends. And I also hope that you've got your holiday soaps ready for gifting!

This year, I made only two holiday soaps: Peppermint Wonderland and this Christmas Tree soap. I usually make more, but hubby and I have been anticipating a move, which has kept us both distracted, and I still have plenty of other soaps that I can gift.

But when I saw this Christmas Tree Swirl tutorial on the Soap Queen blog, I just had to make it. It is inspired by the Secret Feather Swirl technique created by Zahida of Handmade in Florida. (Check Zahida out - her soaps are absolutely amazing!)

This soap features a sort of reverse feather swirl. Instead of pushing a hanger swirl tool into the soap after pouring, I poured the soap over the hanger swirl tool and then pulled the tool out to create the Christmas Tree look.

I used my Essential Depot RED silicone mold along with my hanger swirl tool from Great Soap Shop for this project.

For the oils, I used olive oil, vegetable shortening (soybean/cottonseed blend), coconut oil, and rice bran oil. I had some coconut milk in the freezer, so I used it for part of the liquid along with some distilled water to make up the difference.

The scent is "Eucalyptus Cedar" from Elements Bath and Body, and it is a woodsy, outdoorsy scent
that is perfect for a Christmas Tree-themed soap. It appears that Elements no longer carries this scent, which brings a tear to my eye because it is fabulous. Oh, well, life is full of disappointments.

So, here's what I did. After scenting and bringing the soap to light trace, I split off two 8-ounce portions. One portion I colored with hydrated chrome green pigment and the other with gold sparkle mica.

The rest I colored with super pearly white mica, and also some titanium dioxide just to make sure that the soap turned out a vivid white.

The green and gold soap were then poured into squeeze bottles. (Remember to snip the tips!)

My hanger swirl tool fits snugly into my mold, so I placed it at the bottom and then poured a layer of white soap on top to cover it. Then I squeezed a thick line of green on top of the white soap right above where the hanger swirl tool rested beneath. Then another layer of white, followed by a thick line of gold, more white, more green, and so on and so forth, alternating the colors. I ended up making three green lines and two gold with a layer of white in between each.

Tip: It's good to bang the mold on the countertop and give it a gentle shake every now and then to get rid of air bubbles.

Once I had poured the final layer of white, I pulled the hanger swirl tool straight up and out of the mold to create the Christmas trees inside the cut bars. Then I finished the tops off with the remaining green and gold and texturized the soap just below the surface with a spoon, being careful not to disturb the feather pattern underneath. Actually, I think I held back a bit too much green and gold soap and could have gotten by with less.

I wanted my soap to be at a thin trace, but once again I had trouble with the batter thickening up. Fortunately, the soap was still manageable and everything worked out okay.

At any rate, it definitely looks like there are little Christmas trees inside the soap (although some look more like Christmas trees than others), and the fragrance fits the soaps perfectly.

Here's a video I made showing the process:


I hope that you all have a wonderful holiday! As I mentioned earlier, hubby and I are moving to California at the end of December, but we are going to work in a trip home to Florida for Christmas before we go. After Christmas, we'll take a few days to make the cross-country drive. I'm not sure when I'll have the chance to make another batch of soap since we'll be spending a good chunk of January getting settled. But I will make some as soon as I can!

Wherever you are and whatever you celebrate, I wish you and yours a wonderful holiday season and a happy New Year!

Friday, November 14, 2014

The Dreaded Spots of the Orangeness!

Geranium Patchouli soap with DOS
So you've made a beautiful batch of soap and it is hanging out on the curing rack, evaporating out its water and whatnot. Over the next few weeks, you lovingly check on it and marvel at this wonderful thing you made.

And then you see it. An orange-colored spot - or maybe several spots - marring the pretty surface of your soap and seriously harshing your soap buzz.

What is this ugly plague that is plaguing your soap with its plaguey plague?

It's - dah, dah, DAH! - DOS. No, not the ancient computer operating system. 

Dreaded Orange Spots.

You may remember this Geranium Patchouli soap I made about 16 months ago. I still have some bars from that batch hanging around, and I went to grab a bar recently. I usually let the soap bars cure on my curing rack for 6-8 weeks and then store them in paper bags and it seems to work out just fine. This time, though, the bar I pulled out felt wet and beads of glycerin dew glistened on its surface. 

Handmade soap naturally contains glycerin, which attracts moisture from the air. Humidity can increase the likelihood of glycerin dew, and it can get awfully humid here in Louisiana. It was interesting that none of my other batches that were stored similarly developed the same issue. At any rate, I wiped the afflicted bars dry and let them hang out some more on the curing rack. Now the glycerin dew is gone, but the ugly rust-colored spot remains.

So what causes DOS? Oftentimes it is caused when oils are exposed to oxygen and oxidize, resulting in rancidity. Every oil has a shelf life and some oils have shorter shelf lives than others. DOS can appear at many points during a soap's life - during the cure time or months later, as was the case with my soap. Old oils or oils with short shelf lives may contribute to DOS. And it's sometimes difficult to know how long an oil has been sitting on a store shelf before you buy it. Get your oils from quality vendors that replace their oils frequently to ensure that they are as fresh as possible and pay attention to expiration dates. (To see a comprehensive list of oils and their properties - including shelf life - check out this Soap Queen post.) Some oils - such as canola, grapeseed, and sunflower oils - have a reputation for contributing to DOS, although I haven't soaped with any of those oils and therefore can't comment on my own personal experiences with them.

Oil storage is important. Some short-life oils are best kept refrigerated, and it's always good to store any oil in a cool, dark place away from direct sunlight. Another tip is to transfer oils to smaller bottles as you use them up so that there is less contact with oxygen and therefore less risk of oxidation. Some soapmakers also add antioxidants such as rosemary oleoresin extract (ROE) or Vitamin E to fragile oils to extend their shelf lives.

Higher superfat percentages can also contribute to DOS. "Superfat" refers to the amount of oils that do not interact with the lye and remain unsaponified and sorta free-floating in the finished bars. Most soapmakers factor in a small percentage of extra oil in their recipes to create a more nourishing bar of soap. Some soapmakers advise keeping superfat percentages to 5% maximum (with the exception of recipes containing all or nearly-all coconut oil, which need a higher superfat of up to 20%). I usually use a superfat of 7% in a typical recipe with no problems, but could it have been an issue in this batch? Or was it something else? Perhaps I should experiment with a 5% superfat.

Water is also another important soapmaking ingredient. It's a good idea to use distilled water since tap water may contain minerals that could oxidize and cause DOS.

The curing environment is also important. Let your soap fully cure in a cool, dry place with plenty of ventilation. During the curing process, water evaporates from the soap and the moisture needs to be able to escape. Wire racks are great for curing, just make sure that the metal is coated so that it doesn't rust - rust can exacerbate DOS. If your curing area is particularly humid, a dehumidifier may help.

What caused DOS in my case here? Dunno. Could have been the oils, humidity, storage issues, or something else. It seems that so many soapmaking problems remain mysteries even when potential culprits are identified. I can't point with certainty at any one factor or factors. Hopefully, though, I can better avoid DOS in the future by keeping these tips in mind.

So what should you do if your soap gets DOS? Don't panic. The spots are rather ugly and the soap may smell a bit off, but it is merely an aesthetic issue. I wouldn't want to sell or gift these bars with DOS because eww-gross, but they're still fine to use.

At about the same time I was cogitating on this post, Anne-Marie wrote a great one about DOS on the Soap Queen blog. And also check out this helpful post by David Fisher for more info on DOS.

Have you experienced DOS? What are your thoughts on what causes it and how to prevent it?

Sunday, October 12, 2014

A Christmas Disaster Story

Although I must say that for a disaster, this soap actually turned out pretty well. Just about everything went wrong in the soap kitchen, but this was what I ended up with. Coulda been a lot worse.

First off, let me just acknowledge that, yes, I know, I know. I'm a bit late posting.

I have an excuse, though. A good one even!

Hubby and I are moving soon from Louisiana to southern California. He got a new assignment out there and we are looking forward to the new adventure!

Everything has happened pretty quickly and we're starting to kick into high gear now. If you've ever moved, you know how rapidly you can go from oh-we've-got-plenty-of-time-and-there's-not-that-much-to-do-anyway to oh-my-god-we're-never-going-to-get-all-of-this-done-in-time.

A million and one things that need attention RIGHT NOW are starting to bubble to the surface. In the next few weeks, we need to sell my car, clean out the apartment, tie up loose ends, close accounts here and open new accounts there, coordinate with the movers, and we still have to find a place to live.

And, of course, the normal daily hassles of life continue and stuff like this happens:

Oh, good, another flat.

So, please do forgive me if I am highly distracted for the next little bit while we're moving and getting settled. I did make two batches of holiday soap (this one and one other) before things get too hectic so I would at least have something to blog about, providing I can carve out the time to do so.

Now onto the things about the soaps!

Can you believe that it's already time to start thinking about the winter holidays? Well, it is! And I can't not make a pepperminty soap for the holidays.

This soap, which I think I will call Peppermint Wonderland, was supposed to be a Taiwan Swirl. Obviously, it didn't work out.

My recipe was 8% mango butter, 25% olive oil, 25% coconut oil, 30% rice bran oil, and 12% sweet almond oil.

Alas, I did not end up with the thin trace that I was hoping for. I don't think the problem was my fragrance oils because I used both without incident last year. (The scent here was a combo of Nature's Garden's Peppermint and Winter Garden fragrance oils.)

I used the full water amount, too, and soaped at around 100-105 degrees F.

And I also tried really hard, you guys, to make sure that I didn't overmix, that I brought the soap to the lightest trace possible. And still it thickened up like cake frosting.

So, after finding that cussing profusely did not make the trace any lighter, I accepted the fact that a Taiwan Swirl would be impossible and opted to just plop the soap into the mold with a spoon. I finished with a clumsy attempt at a Celine Swirl.


I think, all things considered, it turned out beautifully and the final bars are pretty enough to be Christmas gifts. And the scent combo is wonderful - the Peppermint and Winter Garden together (the Peppermint:Winter Garden combo was a 1.5:1 ratio) smells like a brisk, minty aftershave or shaving cream to me.

Here's a video showing the disaster unfolding, prompting a change of plans. (Make sure you stick around until the end for bloopers galore!):


And that's how we saved Christmas.

I gotta tell you guys, I am having one helluva time lately finding new palm-free recipes that don't accelerate trace. There are a couple of palm-free recipes that I have had success with: the recipes I used for my Orange Basil Swirled Hearts Soap and Fireburst Soap both behaved well. I may stick with one of those when I want to be sure of a thin trace. 

You know what I've noticed, though? The recipes that give me trouble contain rice bran oil. Maybe the rice bran oil isn't the problem. Perhaps it's just a coincidence and it has more to do with my fragrance or essential oils or my method. But I just found it curious that the four or so recipes I've tried with rice bran oil have accelerated.

What are your thoughts? Does rice bran oil behave well in your recipes?

Wednesday, September 3, 2014

Avocado-Coconut Milk Soap

So, there I was perusing my copy of Soap Crafting, looking for inspiration, when a project called "Avocado Moisturizing Bars" caught my eye. I've wanted to try avocado in soap for a while and this recipe sounded intriguing.

I wanted a palm-free recipe, though, so I went in search of such on the interwebs. And I found this Sea Clay Avocado Facial Bar recipe on the Soap Queen blog, guest-written by Amanda from Lovin' Soap. Bingo. An avocado theme, lots of avocado oil, and no palm oil. I omitted the sea clay, but otherwise followed her recipe.

And then I remembered that I had bought some coconut milk a few months ago, vowing to use it in a batch of soap. This would be the perfect time to make good on that promise to myself.

Avocado plus coconut milk should equal mad luxury.

So, I ended up sort of combining Amanda's recipe with Anne-Marie's technique, adding my own touches along the way.

Anne-Marie's project in her Soap Crafting book is a gradient soap. I wasn't feeling up to a gradient, so I opted to do a single pour.

But! Wouldn't a droplet swirl be a pretty way to jazz things up? And what if the soap used for the droplets was colored with activated charcoal! The black and green would look stunning together, and the charcoal would up the spa-like factor.

So much luxury. I hope everyone can handle it.

And so, here's how the recipe I ended up with looks:


Of course, if you use this or any recipe you find on the web or in a book, please run it through a lye calculator to double-check it! Typos happen!

You may notice that I have listed the coconut milk and water separately. That's because I replaced two ounces of my coconut milk with water for my avocado puree. (More on that in a sec.) The full liquid amount recommended for the entire recipe is 12.160 ounces (345g).

For the scent, I chose Bramble Berry's Wasabi fragrance oil, which is also the FO Anne-Marie uses for her avocado soap project. I love the Wasabi FO! It smells to me like freshly-cut grass with notes of peppermint and ginger. I thought that the bright, green scent would go perfectly with the avocado theme. The Wasabi FO sticks like crazy, too, and it behaves well in cold process soap.

I also added some sodium lactate at 1.5%, which worked out to about 1 1/2 teaspoons per pound of oils, to help create harder bars.

So how do you get the avocado into the soap? After slicing and measuring out 2 ounces of avocado (that's one ounce per pound of oils), I subtracted 2 ounces of liquid from my coconut milk and replaced it with distilled water so I could make a slurry of pureed avocado, as Anne-Marie suggests in her recipe. I suppose I could have just used 2 ounces of coconut milk pulled from my total, but the coconut milk was frozen. (To keep my temps low and to prevent the lye from scorching the coconut milk, I measured the milk and then froze it ahead of time.)

To make the slurry, I added two ounces of water to the avocado and then pureed it with the stickblender until smooth.

Using fresh fruits and vegetables in soap can potentially affect its shelf-life, so it's important to fully puree fruits and veggies because larger pieces or chunks can go bad and get moldy. It's probably best to use bars containing food ingredients within a year or so for optimal freshness.

Once my oils and lye solution were cooled to around 90-95 degrees F, I added the avocado slurry to the oils and stickblended the mixture to get the avocado really well incorporated. Then I stirred in my fragrance oil and added the coconut milk-lye solution. Once the soap was at a light trace, I separated out about one cup and colored it with activated charcoal. I colored the rest of the soap batter with Green Chrome oxide.

Something I seem afflicted with lately is overmixing my soap batter. It seems that I get to a nice trace and then hit the soap one last time with the stickblender, just for good measure, I guess? I did that with my Honeysuckle Mantra Swirl soap and I did it again here. This time, I had a light trace - which was what I wanted - but then after I added the colorants, I stickblended briefly just to mix them in well. I should have just stuck with the whisk because my soap was a tiny bit thicker than I would have liked. The soap was still very manageable, but I wanted a lighter trace for swirling. I have to learn to stop myself when I get that urge to mix things one more time.

I poured the green soap into the mold and then drizzled the black soap onto the green from up high so it would penetrate into the loaf. Looking back at the video, though, I don't think I poured from high enough. That plus the slightly thick trace made for less dramatic droplet swirls. Oh, well, the soap is still pretty!

After pouring the soap, I stuck it in the freezer overnight to prevent gel phase because there is a risk that the avocado could turn brown if the soap gets too hot. I also used a thin plastic loaf mold - I didn't want anything insulated (like a wooden mold) that would retain heat.

Here's that video I mentioned showing how I made this soap:


I am very pleased with how the soap turned out! The ingredients are luxurious, and the Wasabi scent is amazing! Overall, I like the droplet swirls and the texturing on the tops. I've tested an end piece, and, boy howdy, is it nice.

Have you ever tried avocado in soap? Coconut milk? How did you like it?

Tuesday, August 5, 2014

Honeysuckle Modified Mantra Swirl Soap


You may remember a technique called the Mantra Swirl that was popular a while back. There was even some mantra swirl soapmaking challenges on the interwebs. I thought all of that happened just a few months ago, but it was LAST SUMMER, you guys. A whole year. Time is moving faster than a batch of clove soap.

Anyways, I figured it was high time that I gave the mantra swirl a whirl, especially since I got some cool tools to help make things easier.

One of the reasons I put off attempting the mantra swirl is that I'm lazy. And not very handy. And also lazy.

You see, back when the mantra swirl first caught on, most people made themselves dividers out of cardboard. Those cardboard pieces had to be cut just so. And then they had to be held upright in the mold, usually with more cardboard pieces that were cut into brackets. And I suppose that the brackets had to be anchored to the mold somehow, too. I was like, "Pfft! I'm not doing all that! What am I, an engineer?"

But then I heard somewhere about Great Soap Shop on Etsy. Michelle sells lots of nifty soapmaking tools, including HDPE plastic dividers for the Mantra/Taiwan swirl. So now I have no excuse not to try it.

The dividers I bought were specifically designed to fit Essential Depot's RED silicone soap mold. (Great Soap Shop offers tools for other molds, too, so do check it out.)

I decided to try a modified mantra swirl from Anne-Marie Faiola's Soap Crafting book. I did a simple side-by-side two-color batch and then used a squeeze bottle to pour a line of soap down the center. Then I took the stick end of a meat thermometer, put it all the way down to the bottom of the mold, and did a figure-eight pattern all the way across the length of the mold to swirl the tops. (Of course, you don't have to use a meat thermometer. Skewers or chopsticks or any stick-like thing will do.)

Here is my poorly-drawn example of the Mantra Swirl figure-8 pattern.

For the fragrance, I chose Bramble Berry's new Heavenly Honeysuckle scent. I got to try this one out when I was on their S.O.A.P. Panel this past spring and it was my second-favorite scent of the eight samples I received. The colors that came to mind for this scent were orange, yellow, and green. So I decided to do Tangerine Wow and Fizzy Lemonade side-by-side with a line of Hydrated Chrome Green along the top.

I concocted my own recipe of 30% rice bran oil, 25% olive oil, 25% coconut oil, 12% mango butter, 5% sweet almond oil, and 3% castor oil.


After I brought the soap to trace, I colored about a half cup of the batter with the Hydrated Chrome Green and poured it into a plastic squeeze bottle. (It's good to snip the tips of the squeeze bottles so that the soap flows more easily.) Then I split what remained of the batch into two portions and colored one with the Tangerine Wow and the other with the Fizzy Lemonade.

I poured the orange and yellow soap into my mold at the same time so that none of the soap would slip under the divider and onto the other side. Once the two halves were poured, I took out the divider and squirted the green soap along the center line. Then I used my stick to do the mantra swirl on the tops.

My soap did get pretty thick on me and I worried that it would affect my final soap. Everything turned out just fine, though. Bramble Berry notes that the Heavenly Honeysuckle does accelerate a bit, but I didn't have any trouble with it when I tested it for the S.O.A.P. Panel. But then, I wasn't trying to do anything fancy then, either. When I was on the Panel, I added the FO after trace, whisked it in, watched it for a couple of minutes, and then poured it into the mold. I also suspect that my actions may have caused the soap to accelerate. Looking back, I continued to mix it for too long. When I watch the video (hey, there's a video!), I can pinpoint the moment when I should have stopped mixing. And then I watch myself grab a stickblender for one more go. Aargh. Also, this is a new recipe that I just sorta came up with and hadn't yet tested. (As a side note, it seems to make really nice soap!) I need to try this recipe a few more times before I can truly know how it behaves. I did use full water, though, and I soaped fairly cool, right around 100 degrees F. But I do think the soap may have turned out more swirly if I had poured my soap at a thinner trace.

Here's a video I made of the process. I tried something new this time, you guys. I talked my way through this video instead of relying on captions. I was shy about talking before - and I still am - because I tend to babble like a crazy person when I feel pressure to talk. Plus I don't really like my voice. But I thought I'd give this new format a shot. Whaddaya think? Do you like the talky stuff? (Oh, and make sure you stick around for the blooper at the end!)


Overall, I'm pleased with this soap. The colors are pretty and the bars smell uhmazing. I think next time I would like to try the mantra swirl with three colors side-by-side (which I can also do with my plastic dividers!) so that the middle of the bars are more interesting. That way, too, I could cut the soap horizontally and have a nice big swirl on each bar, since the swirl will be on the top and the bottom of the loaf that way. This time, since the mantra swirl was only on the top, I cut the bars in the traditional way so that each one would have a bit of the swirl on it.

I'm already thinking about a mantra swirl for the holidays ...

Have you tried the Mantra Swirl technique? What about the Taiwan Swirl? That one is on my list, too!

Sunday, June 22, 2014

Fireburst Soap

If you've been following this blog for a while, you may remember some Candy Cane soaps that I made for the holidays using the Impressionist Swirl technique. To do the Impressionist Swirl, you divide your soap into as many colors as you'd like and then use squeeze bottles to drizzle the soap into the mold.

Typically, the soap is drizzled horizontally into the mold, along the long sides, to create the Impressionist Swirl. A while back, I saw a post by the Otion Soap Blog where they did something similar to an Impressionist Swirl, but instead of squirting the soap horizontally, they squirted it vertically, making S-shapes along the short sides of the mold.

I thought I'd give that a try for this batch.

For a project like this one, you want to pick a well-behaved soap recipe and fragrance oil. For the recipe, I chose David's palm-free recipe using vegetable shortening, olive oil, coconut oil, and castor oil. (Make sure you check the label carefully on the vegetable shortening if you want a palm-free recipe. Some shortenings contain palm oil. The one I used was a blend of soybean and cottonseed oils.) To calculate the recipe, I headed over to SoapCalc to figure out the lye and water amounts. For the vegetable shortening, I selected "Crisco, old" from the Oils, Fats, and Waxes list. (For tips on which shortening to select from SoapCalc's list, see FAQ #9 on their website.)

I have been experimenting with palm-free recipes lately. I haven't settled on a favorite yet, although I have tried many that I enjoyed. I have used David's recipe once before and knew from my notes that the batter stayed nice and loose for me, which is exactly what a project like this one requires.

For the scent, I chose Bramble Berry's Energy fragrance oil. It is one of my favorites, and it has always behaved well for me.

To do the swirls (or whatever you want to call them), I used squirt bottles that I found in the baking/candymaking aisle of the craft store. After I brought the soap to a light trace - the soap needs to be emulsified, but still fluid and loose - and scented it, I divided the soap evenly among four plastic measuring cups prepped with colorant. For my colorants, I chose Bramble Berry's brick red oxide, yellow oxide, titanium dioxide, and orange mica. (BB no longer carries the orange mica, which gives me sad face.) To avoid clumping, I mixed each colorant with some liquid glycerin before adding the soap to it. After I added the soap to the measuring cups, I whisked it to mix the colors in well, and then gave it a quick buzz with the stickblender to make sure that the colors were fully incorporated, being careful not to blend too much in order to keep the soap at a very light trace.

Once the soap was colored, I poured each color into a squeeze bottle. (Tip: Be sure you snip the tips of your bottles to create a bigger opening so the soap flows more easily.)

Then, instead of squirting the soap along the long sides of the mold, I squirted the soap in a S-pattern along the short sides, alternating colors as I went. I tried to hit different spots while drizzling, going in between one color with another and covering different parts of the mold.

After a few sweeps, it's good to rotate the mold so that the colors are more evenly distributed throughout the loaf. Tap it against the countertop, too, to get rid of air bubbles. And if the soap starts to thicken in the bottle, just put your finger over the top (very important!) and give it a good shake.

When squirting the soap, I try to drizzle the same amount each time I sweep through. A good thing to do is to count to three or whatever each time so that roughly the same amount of soap is being used with each squirt.

Even though I try to evenly split the soap, it seems that I somehow always end up with more of some colors than others. And it also seems that no matter how hard I try to drizzle the same amount each time, I end up running out of one or two colors before I'm done with the batch. This time, I ran out of yellow and orange before I was completely finished. Fortunately, I was almost done, and I was able to finish off with the red and white without compromising the effect too much. Once I was done drizzling all of the soap, I took a toothpick and did a sort of herringbone swirl on the tops, dragging the toothpick just below the surface in alternating directions.

Here is a video showing how I made this batch:


I love this effect, and I really like how this batch turned out. Because the scent and colors are so lively, I decided to call this soap "Fireburst." I'm not sure if the soap gelled, as it was still very soft a week later when I cut it even with the sodium lactate that I added to the lye solution at 1.5%. I may experiment with adding some cocoa butter or something like that to the recipe to make a harder batch.

Squirting the soap vertically along the short sides of the mold creates wavy lines in the cut bars, while squirting the soap along the long sides horizontally creates more of a teardrop effect. Here is how the two compare:

Right: Impressionist Swirl (horizontally); Left: Twist on Impressionist Swirl (vertically)

Oh, and here's another tip - after I was done with the squirt bottles, I got as much soap out of them as I could and then added a couple drops of dishwashing detergent to the bottles along with some warm water. I gave each bottle a few shakes, emptied and rinsed it, and repeated until clean.

I've already tried an end piece from this batch, and it is very nice soap with lots of bubbly lather. I can't wait until it fully cures!

Have you used squirt bottles in soapmaking? What are some of your favorite ways to use them?


Thursday, May 22, 2014

Spa Salt Bars With Activated Charcoal

If you are a soapmaker like me, you probably have several batches of soap laying around at any given time. And you probably don't use up one batch and then start in on another. You probably take a bar from this batch, and then next time take one from another, and ooh, I haven't used one of these bars in a while...

Sometimes I end up with soap that has been around for a year or more. Which is fine. It seems soap is like wine - it gets better with age. I even still have a bar from my very first batch of cold process soap back in February 2011. It's a plain little bar and the scent has completely faded, but it still looks to be a fine bar of soap otherwise.

Anyway, that is how I ended up making my last batch of salt soap last over a year. If you've been following this blog for a while, you may remember that it was a Pineapple Ginger-scented soap made with coconut oil, avocado oil, castor oil, and Pink Himalayan salt.

I really enjoyed that batch. The recipe makes big, long-lasting bars. And I especially like salt bars for my face. I have oily skin, and it feels like the salt just gets into my pores and balances everything out.

When I realized that I was down to the last bar, I just had to make some more. I did things a little bit differently this time, though.

Last time, I followed Sarah's salt soap recipe. I love this recipe and highly recommend it. The avocado oil makes the bars more luxurious, and the castor oil gives the lather a boost.

This time, though, I decided to try a recipe of 100% coconut oil with a 20% superfat. Usually soapmakers
use about 30% or less of coconut oil in their recipes because it can be drying. But, as a neat kind of break-the-rules thing, coconut oil can be used exclusively if you include a high superfat. Superfat refers to the amount of unsaponified oils in the soaps, meaning that those oils don't react with the lye and remain free-floating in the soap, resulting in more nourishing bars. For a normal soap recipe, I usually go with a 7% superfat. But for 100% coconut oil soap, I went with 20%.

Coconut oil is the main oil in salt soap because coconut oil is the only oil that lathers well in salt water, making it perfect for salt bars. It's typically 80-100% of the total oils. Last time I used 80%. This time I wanted to try 100%.

The salt I used was different, too. Instead of using Pink Himalayan salt, I just used plain old table salt. The amount was different, too. Last time, I used the salt at about 65% of the total oil weight. This time, the rate was 100% of the oil weight, meaning that for 32 ounces of oil, I used 32 ounces of salt.

Salt soap is great for the entire body, but, as I mentioned, I especially like it for my face. So, when deciding on how to proceed with this new batch, I thought of activated charcoal. Activated charcoal is supposed to be good for detoxifying oily, acne-prone skin. I figured the salt plus the activated charcoal would make a great facial bar. I used one teaspoon of activated charcoal per pound of oil.

I love how the sides are shiny and smooth like granite!
Because salt bars have a spa-like feel to me, I wanted to keep things more natural this time, fragrance-wise. So I scented this batch with cedarwood essential oil (which, according to Wanda Sellar's The Directory of Essential Oils, may be good for oily acne-prone skin, too) and clove essential oil. I would have liked to have used sandalwood essential oil as well, but, gawd, have you seen how much that stuff costs? So I used Bramble Berry's Indian Sandalwood fragrance oil instead. For 32 ounces of oil, I used 1 ounce of the sandalwood FO, .80 ounce of cedarwood EO, and .20 ounce of the clove EO. I went easy on the clove because too much can irritate the skin. Clove can also accelerate trace.

When my oil and lye solution were both around 100 degrees F, I added the fragrance blend and the activated charcoal to the melted coconut oil. (I mixed the charcoal with some glycerin first to avoid clumping.) Then I added the lye solution to the oil and stickblended to trace. Once the soap traced - which it did pretty quickly - I gradually whisked in the salt. When it was incorporated well, I poured the soap into the mold.

For this batch, I opted to use my slab mold. Salt soap can set up very quickly, and if you make a loaf and don't slice it at just the right time, you can end up with hard, crumbly soap that is difficult to cut. Using a slab mold with dividers takes the guesswork out of when to cut. I let the soap gel and unmolded it the next day.

Here is a video showing how I made this batch of salt soap:


The lather of a salt bar is different from that of a regular bar of soap. Salt soaps tend to be more frothy and less bubbly. The lather kinda reminds me of shaving cream or the foamy head of a beer. You can see the difference in the video above - I compare the lather of my regular soap to that of the salt soap.

I'm so glad to have salt soap back in my rotation, especially as the weather heats up. It seems that the hotter it is the more oily my skin gets. And these salt bars will be a treat for my face and the rest of my skin!

Have you made or used salt soap? Did you like it? Do you enjoy any other additives to make salt soap extra special?

Thursday, April 24, 2014

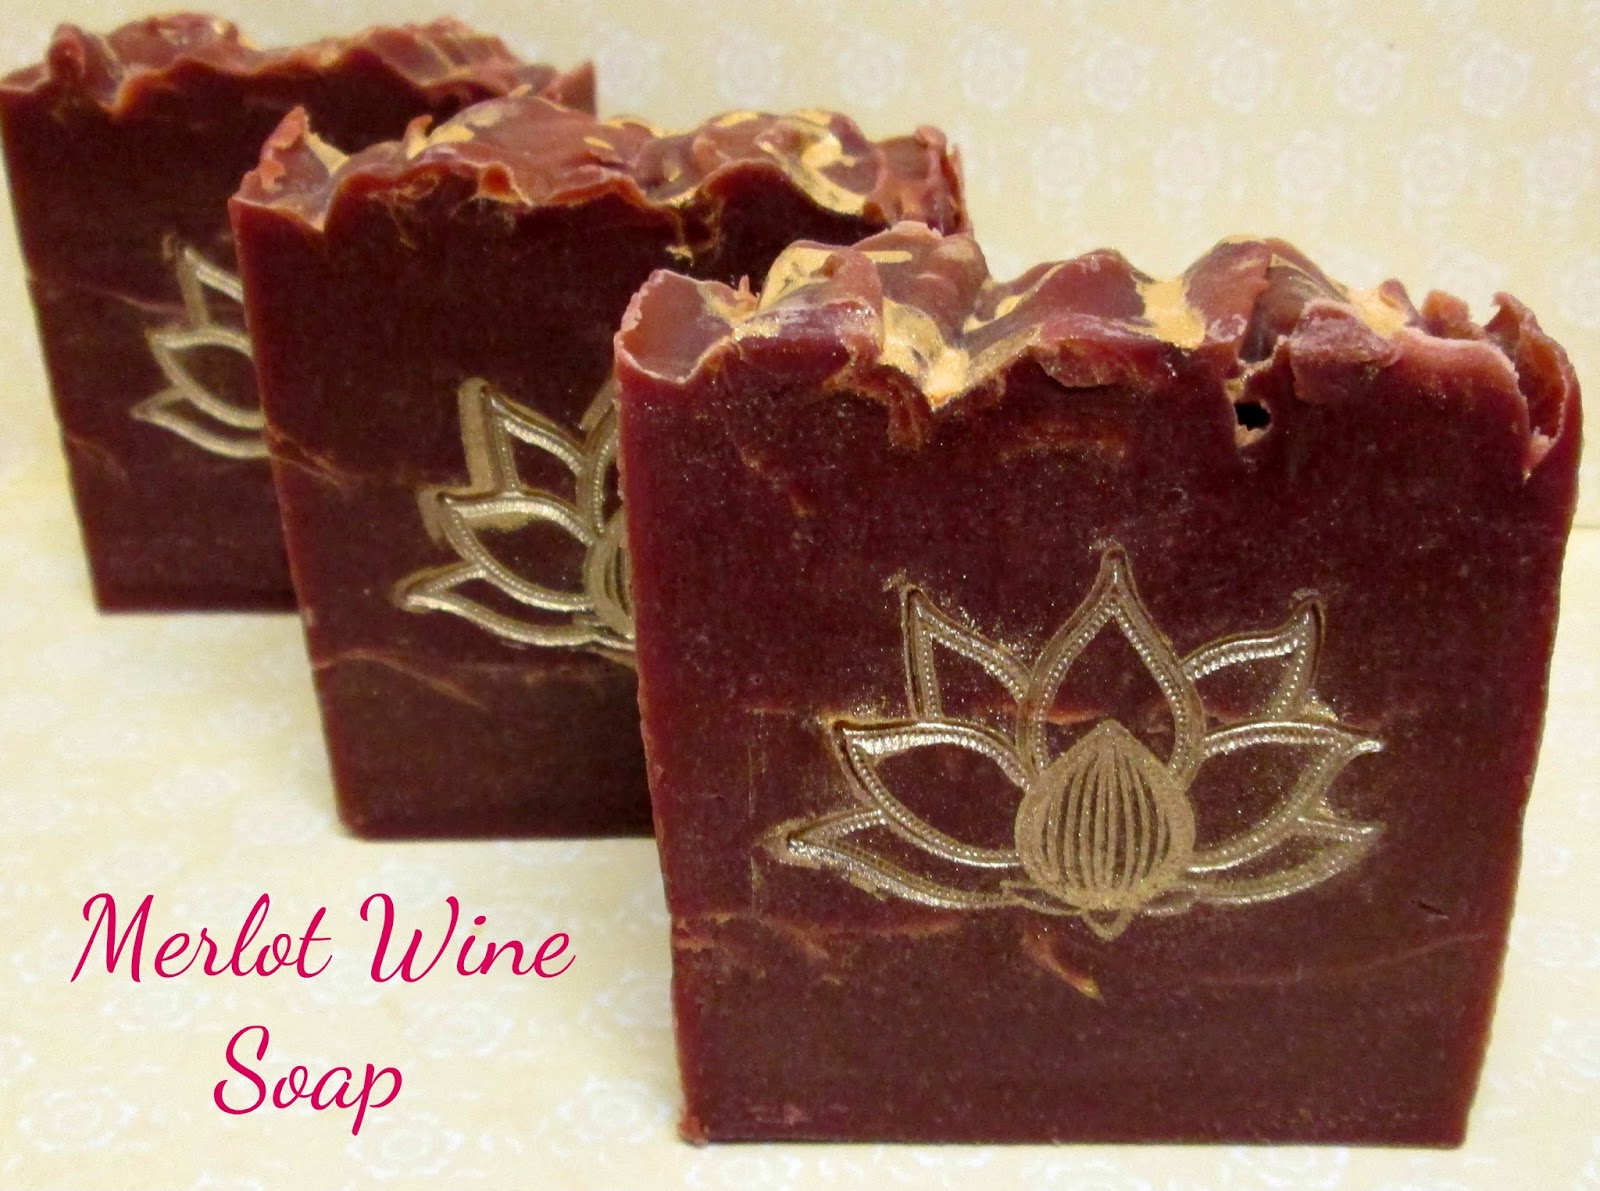
Merlot Wine Soap

I'm finally getting around to something that I've been meaning to try for a while now - wine soap!

Making wine soap is a lot like making beer soap, and wine and beer bring similar qualities to the bars. The natural sugars in each help to boost the lather, making it fluffy, creamy, and luxurious. Both are wonderful additives, and they add interest to a batch.

Using alcohol in soap can be tricky, though. Alcohol can cause the lye solution to bubble up like a volcano eruption. And it can make the soap seize, which will absolutely ruin a day in the soaping kitchen. (If you want to see an epic seize, check out this video to see the time I got soap-on-a-stick.)

The good news is that you can take steps to avoid volcanoes and soap seizes. The best method I know of is to bring your wine or beer to a boil on the stove top and let it simmer for about 10 minutes or so to cook out the alcohol. You'll lose some of the liquid due to evaporation, but you can either boil more than you need, or simply make up the difference with distilled water.

Boiling, measuring, and freezing the wine
For this batch, I used Recipe 1 from Amanda at Lovin' Soap. It contains olive oil, coconut oil, castor oil, cocoa butter, and rice bran oil. I replaced the water with Merlot wine (go ahead and buy the cheap stuff, you guys), which I boiled first as described. A 750 mL bottle worked perfectly for my recipe - I needed 18.24 oz. (or 518g) of liquid, and 750 mL (which is about 25.36 oz. or 719g) of simmered wine ended up being just right. If you end up with more wine than you need or you want to reserve some for later, you can portion some out and freeze the rest. Just weigh what you need and pour it into plastic freezer bags. It's helpful to write the weight on the outside of the bag for future reference.

Another thing about working with wine or beer or even milks is that the natural sugars can cause the soap to heat up quickly. Also, if your lye solution gets too hot, the sugars can scorch. To combat this problem, I froze my wine after it had been simmered and cooled. After adding my lye to the frozen wine, I stirred the lye solution in an ice bath to keep the temperature low. Overall, I soaped cooler, too. I normally soap between 100-110 degrees F, but for this batch, I combined the lye solution and the oils when the lye solution was at about 84 degrees F and the oils were at 91 degrees F. And because batches that contain wine, beer, or milk can heat up more than batches that don't, I didn't insulate my mold.

For the fragrance, I chose Bramble Berry's Bordeaux Blend, which I had bought a while back. It is perfect for a red wine-type soap. It's fruity and spicy; sweet but sophisticated.

The wine/lye solution had a bit of a brownish-green tinge, and it smelled a little funky. (Don't worry, the funky smell should disappear during the cure.) To make sure that my soap stayed a deep red Merlot color, I added a generous amount of Merlot Sparkle mica into my oils before adding the lye. (I mixed the mica with a bit of glycerin first to avoid clumping and streaking.)

Once I added the fragrance oil and the mica to my cooled oils, I mixed in the lye solution, pouring it through a strainer just in case there was any undissolved lye. Then I stickblended the soap to a medium-thick trace.

Bramble Berry mentions that the Bordeaux Blend FO may move quickly, I would guess probably because of the cinnamon and clove notes. The soap did get thick on me, but it wasn't unmanageable at all. Besides, I was doing layers so a thicker trace worked out perfectly.

Fragrance oil and micas
You guys remember the mica oil swirl trend last year, right? I thought that it might be interesting to do mica oil swirls not just on top of the soap, but inside of the soap, too.

To make the mica oil, I mixed some Gold Sparkle mica with some olive oil. To make the swirls, I drizzled the mica oil onto the soap with a pipette. The olive oil saponifies along with the rest of the soap, leaving behind the shimmery mica.

I poured about one-third of the batter into my mold, drizzled some mica oil on top and then swirled it with a spoon, poured another third of the batter and drizzled and swirled more mica oil, and finally poured the rest of the soap batter and topped it off with more mica swirls.

I was going for crackled, wispy gold lines running horizontally through the bars. Overall, I was happy with the results, although the lines ended up being a bit more subtle than I was hoping for. So, I decided to jazz things up a bit more by stamping the soaps. To stamp the soap, I pressed my stamp into some dry mica, tapped off the excess, and then gently pressed the stamp onto the surface of the soap. It is best to stamp freshly-cut soap so that the mica will stick.

Here is a video showing how I made this batch:


I am very happy with how these turned out! The stamp adds so much drama, and the gold looks so great against the deep red. You can see the wispy mica lines faintly, which I think is nice even if I was hoping that they'd be a little more distinct. A jagged mica pencil line might have been cool, too. Or it may have been neat to drizzle the mica oil in between the layers and leave them be without swirling. The effect may not have been as widespread throughout the bars, but it may have created some dramatic mica specks.

I've already tested an end piece sliver, and these bars lather great! The bubbles are fluffy and creamy, and the soap smells spectacular. I've also got some Pinot Grigio FO in my fragrance bin, so there will probably be more wine soap in my future someday.

Have you ever made or used wine soap? Did you enjoy it?