Wednesday, June 20, 2012

Carrot, Orange, and Ginger Soup (I Mean, Soap!)

My Carrot, Orange, and Ginger soap
Sometimes I'm in the mood to attempt something very ambitious with my soapmaking. A six-colored swirled soap, maybe, or a layered masterpiece. A funnel swirl or an embed soap. Salt bars. A soap made with goat's milk and beer.

This was not one of those times. This time, all I wanted was a simple, comforting, soul-soothing soap with a leisurely, luxurious trace. A single-pour soap, with an amazing fragrance blend.

I still wanted it to have some personality, though. One day, as I was staring into my fridge (you gotta keep your eye on those things, you know), I realized that I had a bunch of carrot juice that I would never drink. So, I decided to make a soap with carrot juice in place of the water.

What fragrance would go with carrot juice, though?

I have a Tomato Leaf fragrance oil. Carrots and tomatoes? Maybe. The soap will probably turn out bright orange ... ginger! What would go well with ginger? Lemongrass? Yes, lemongrass!

Ginger and lemongrass it was. But something kept nagging at me.
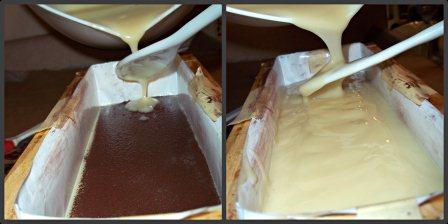
Pouring soap into mold

Carrots and ginger, carrots and ginger ... where have I heard that before?

And then it hit me - I sometimes make a carrot, ginger, and ORANGE soup!

Yes! Carrots, orange, and ginger! In a soap this time instead of a soup!

So, ginger and orange it was.

And to make things interesting, I decided to go with textured tops and a light sprinkling of mica.

I settled on one of my favorite recipes of olive, coconut, sustainable palm, and avocado oils. (I so adore avocado oil in soap!) As I expected, the carrot juice gave the finished soap a gorgeous, rich orange color.

For my fragrance blend, I chose Bramble Berry's Orange essential oil (10x) and Majestic Mountain Sage's Ginger fragrance oil. I used them in almost equal proportions, opting for just a bit more orange than ginger.

After stickblending to a glorious medium-thick trace, I poured the batch into my lined soap mold and then waited a few minutes before manipulating with the tops with a spoon, letting the soap set up some so it would hold the peaks. I just sorta scooped my spoon into the batter a bit and then let the soap plop back down onto the surface. And once I started scooping and plopping, it was difficult to stop. I really think I could have made an afternoon of it. After much fiddling, I was finally happy with the tops, although I wish my peaks had a bit more oomph.

Using spoon to make peaks (l); mica dusting (r)
Then I used my tea strainer to sift some Copper Sparkle mica onto the tops, much like I did with my pencil line soap.

I love how this soap looks, and the scent is amazing. A bit sweet and citrusy, and a bit warm and spicy. Ginger is such a wonderful fragrance - I will have to play with more blends. I still think ginger and lemongrass would be nice together, as would ginger and peppermint.

And I am curious to see how the carrot juice contributes to the soap. I would think that the natural sugars in the carrots should boost the lather. I have to let the soap cure for a few more weeks before I can use it, though!

Have you ever used carrot juice in your soaps, or used a soap that contained carrot juice? What kinds of fruit or vegetable juices do you like in your soaps? How has food inspired your soapmaking?

Monday, June 4, 2012

Cucumber Melon Gradient Soap

My Cucumber Melon gradient layer soap
One soapmaking technique that I've really been wanting to try is making gradient layers. I've also heard them called gradated and graduated layers - I don't know which one is correct. Perhaps they all are. Anyway, the idea is to have a color gradually change from dark to light with each progressive layer. Of course, you can use more than one color for gradient layers, too.

I had seen the technique many times, but never tried it. The first time I saw it was on Anne-Marie's Soap Queen blog. When Anne-Marie posted this tutorial, I had just started my journey into cold-process soapmaking and didn't feel up to the task. I vowed to try gradient layers someday when I had more experience, though.

Sometime later I saw this very helpful YouTube video about making an Ombre layer soap (which is yet another name for this technique) that one of my forum friends, Emily from Shieh Design Studio, created. (I like her method very much and borrowed from it to make my own soap.)

When Amy Warden from Great Cakes Soapworks recently coordinated a weekly soap challenge that included a gradient layer challenge, I decided to finally give it a try. I didn't get my soap done in time to participate, but I followed the weekly challenges closely and was inspired by all of the beautiful soaps created by such talented soapmakers.

For my gradient soap, I decided to use a Cucumber Melon fragrance oil from Elements Bath and Body. (I would link to the fragrance oil, but as of this writing it appears that Elements is no longer carrying Cucumber Melon, which is a shame because it behaves beautifully in CP soap and it smells wonderful.) This fragrance is one of my dad's favorites, so I wanted to make a batch to share with him. (Father's Day is right around the corner!) For my colorants, I chose Bramble Berry's green chrome oxide and gold sparkle mica.

I made my main batch of soap and added the fragrance oil to my base oils before adding the lye solution. Then I portioned the soap off after I brought the main batch to trace. I wanted mostly green layers with a little bit of gold on the top. For my batch size (which was 2 pounds of oils), I started with 2 cups of green soap. I poured one cup of the green soap into my mold and then added another cup of uncolored soap to the remaining green soap, lightening it. I repeated this process two more times, each time getting the soap a lighter shade of green.

For the gold layers, I wanted the opposite effect - I wanted my layers to start out lighter and gradually get darker. So, I poured off a half-cup of soap and colored it white with some titanium dioxide, and then colored the rest of my main batch gold. Then I added a half-cup of gold soap to the white and poured a half-cup from that portion into my mold. Using that process, I made two more gold layers, each one a bit darker than the last.

Here is a video I made of the process:


Overall, I was very pleased with how my soap turned out. I was hoping that my layers would be more distinct and the lines a little straighter. Perhaps my early layers should have been at a thicker trace, and maybe I should have poured with a bit more care. I did pour over the back of a spoon to prevent the soap from breaking through the layer below it, but I still may have been a bit sloppy. I still think it looks cool even if the layers are dipping into each other a bit, though.

I am looking forward to trying this technique again. Next time, I think it might be neat to do a gradient that goes from blue to green to yellow, or red to orange to yellow. And, of course, the single-color layers are gorgeous, too.

What do you think of gradient layers? Do you like the look? Have you made gradient layer soaps? What are your favorite color schemes?

Saturday, May 19, 2012

Update: Castile Soap

My Castile soap
If you've been following this blog from early on, you may remember this post about my Castile soap. I made that batch on January 6. As you may know, Castile soap benefits from a nice long cure. Well, mine has been curing for about four and a half months now, so I figured it was time to give you all an update on its progress.

Castile soap is traditionally made exclusively of olive oil. A more typical soap recipe may include several different oils and butters in a single batch.

Ideally, Castile soap is left on the curing rack for much longer than regular soap. Curing allows the excess water in the soap to evaporate, creating a harder, longer-lasting bar. Soap also becomes milder as it cures. My typical soap recipe usually includes olive oil, coconut oil, and sustainable palm oil, along with a small amount of another oil or two (like avocado oil, castor oil, shea butter, etc.). After about 6 weeks, a typical batch is cured and ready to be used. Castile, on the other hand, is best enjoyed after a longer cure - I've heard four months as a minimum, with six months to a year as being even better. (But it seems that any soap gets better with age, whether it is Castile or not.)


Castile soap's lather improves as it ages. Olive oil on its own does not create a fluffy lather - you need oils like coconut or palm kernel for that. Olive oil does create a stable, conditioning lather, though. In my typical soap recipes, coconut oil is what creates big bubbles and abundant lather. Castile's lather consists of smaller bubbles and has a more slippery feel. Some folks refer to this slipperiness as "sliminess." Castile does seem to be a bit stickier and tackier than my other soaps, but I don't find the texture unpleasant.

An interesting thing about Castile is that it is made entirely with a soft oil. Often oils such as coconut and palm are included in soap recipes to contribute to a harder bar. Although olive oil is a soft oil, Castile soap becomes very hard over time. Initially, my Castile soap was very soft and I had to wait almost a week after making it before I was able to cut it. If I had done a steeper water discount, my soap would have hardened more quickly and I could have cut it sooner.

Comparing the lather of my regular soap (l) versus Castile (r)

Below is a short video that I made comparing the lather of one of my regular soaps with the lather of my Castile soap:


It's pretty much me washing my hands and sudsing up a shower pouf with each, but it gives you an idea of how Castile performs. In the video, I used my Orange Patchouli bar (made with olive, coconut, sustainable palm, and avocado oils) as an example of one of my regular soaps. The Castile soap had cured for 18 weeks by the time I shot the video. I made the Orange Patchouli soap soon after the Castile, so it had been curing for about that long, too.

Castile's lather after 6, 12, and 18 weeks
With all of this talk about long curing times for Castile, I should point out that it is perfectly safe to use Castile after the usual cure of 4-6 weeks. It won't be as nice, though. I'll admit that when I tried my Castile for the first time after allowing it to cure for six weeks, I wasn't impressed. I had to work very hard to achieve any sort of lather, and all it seemed to do was run off my hands and down my arm. I will say that although my regular soaps feel very nice on my skin, the Castile left my hands feeling a bit more nourished and moisturized after I rinsed. I didn't notice too much of a difference after 12 weeks, but I did see a change after 18 weeks. As you can see in the photos to the left, the lather is a bit more bubbly and less slippery by Week 18. I think after 24 weeks, it will be even better.

I believe that the way to best maximize the lather of any soap is by using a mesh shower pouf, and this is especially true with Castile. The pouf kicks up more of a lather, and it seems that the more you scrub, the more lather you get. In the shower, the Castile's lather doesn't seem too different from the lather I get from my regular soaps when I use the pouf. Less bubbly and fluffy, yes, but still creamy and dense.

So, it was a bit of a rough start, but Castile eventually won me over. It seems that most folks either love Castile or hate it. Those who love it enjoy its luxurious, creamy feeling, and those who hate it don't care for its lack of bubbles or its "sliminess." And although I wasn't sure what to think at first, I did find myself liking Castile very much after it had cured for a while. I think the four-month cure as a minimum is a good rule of thumb, and, if you have the time and patience, an even longer cure is probably better.

How do you all feel about Castile? Love it, hate it, never tried it?

Friday, May 4, 2012

Soapy Haul: Essential Oils

Hi, my name is Jenny, and I'm a fragrance/essential oil addict.

I am. I can't help it. It's like, I get around fragrance and essential oils and I just become another person. A weak and powerless person. I don't even know what happens when I get around that stuff. It just takes over. It makes me do strange things with my credit card. And later, after I regain consciousness, I think, My God, what have I done this time?

My friends and family members have seen it. I will get into my stash and sniff and sniff and sniff while my life crumbles around me. The dirty clothes need to be washed and dinner needs to get cooked? Sorry, hon, but I'm busy hanging out with my good buddies Cucumber Melon, Patchouli, and Monkey Farts. Maybe there's a DiGiorno in the freezer, and you do have more than one shirt, don't you?

Me during some very dark times
It started innocently enough. When I first started making soap, I bought two - two! - fragrance oils. And with my next order, I bought more. And more the next time. Each time, more and more and more. Now, they've taken over an entire storage cabinet. Actually, my soapmaking addiction has taken over half of a spare room.

I justify my behavior. I tell myself, Oh, I'm not so bad. I know lots of other people who are in deeper than I am. People who have hundreds, nay, thousands more fragrance oils than I do. And half of a room is nothing - some soapmakers have entire buildings dedicated to their addiction. I've got this under control, and I can quit anytime I want.

And although I already have a bunch of fragrance oils that I really should use up before I buy new ones, I still somehow end up purchasing more. It's like it's never enough, and if one is good, twenty is better.

I don't know how much money I've spent on my soapmaking addiction. I'm afraid to do the math.

And yet, when one of my suppliers recently had a sale on essential oils, I lost control again. I bought ten four-ounce bottles of essential oils from Soap Making Resource. But I had to ... it was a sale! The oils I bought were anywhere from 12%-71% off! I couldn't afford to not buy them.

Although I have lots of fragrance oils, I have few essential oils. And this sale provided me with the perfect excuse opportunity to stock up so I can try some new blends.


So here's what I got:

Patchouli: Earthy and rich, like sweet dirt.

Grapefruit: Know what? I can't stand the taste of grapefruit. It's right up there with cantaloupe. Yuck-o. But I like how it smells. The scent is light and citrusy with a pleasantly bitter bite.

Spearmint: Love-love. Super strong and minty, like Wrigley's Spearmint gum.

Litsea Cubeba: Lemony and sweet, like lemon candy. Good for anchoring citrus scents.

Geranium Rose: Light rose scent.

Lavender Premium: Because the price was so good, I sprung for the Premium instead of the 40/42, which is what I usually use. The Premium is supposed to be more floral and less camphoraceous than the 40/42.

Rosemary: Green, woodsy, and slightly minty with a touch of camphor.

Sweet Basil: Green and herbaceous with a touch of licorice.

Lemongrass: Very lemony with a hint of greenness.

Cedarwood: Smoky and woodsy.

And some FREEBIES!


Sample of Tea Tree essential oil: Tea Tree is interesting. When I sniff just Tea Tree EO, I always think of my grandfather's workshop. He was an avid radio-controlled plane flyer, and I remember his workshop smelling of sawdust and gasoline. That's what Tea Tree smells like to me on its own. It's not a bad smell, but it's also not a pretty smell. When used sparingly in a blend, though, it's wonderful. (Lavender and Tea Tree is a personal favorite!)

Madder Root Powder: A lovely orange-red powder. I hear that it can produce a color anywhere from a light pink to a rich red, depending on how much is used. I haven't played around much with natural colorants, so I'm looking forward to trying this out.

Peppermint Leaves: I think I'll grind these up into a fine powder to add specks of color or to create a pencil line in my minty soaps.

Tussah Silk: I was so hoping that I would get some of this in my grab bag! I have heard so many good things about silk in soap, and I've wanted to try it. My understanding is that you add a pinch of silk to your hot lye solution and allow it to dissolve, infusing your lye. Silk is supposed to give soap more lather and luxurious suds.

What am I going to do with all of this stuff? Well, I have been keeping a notebook with fragrance blend ideas. Here are some I'm considering trying with my new arsenal of essential oils:

~ Cedarwood and patchouli
~ Cedarwood and peppermint
~ Geranium rose and peppermint
~ Grapefruit and patchouli
~ Lavender and grapefruit
~ Lavender and lemongrass
~ Lavender with rosemary, tea tree, patchouli, basil, litsea cubeba, or geranium rose
~ Lemongrass and tea tree
~ Lemongrass with peppermint and/or spearmint
~ Orange 10x with lemongrass or litsea cubeba
~ Patchouli with lemongrass and/or litsea cubeba
~ Spearmint with eucalyptus or peppermint
~ Blend of lavender and cedarwood with a bit of patchouli
~ Blend of lemongrass, basil, and rosemary

What do you think of my blend ideas? What are some of your favorite fragrance blends?

Tuesday, April 17, 2012

The Pencil Line

My pencil-line Eucalyptus Clove soap
If you are a soap connoisseur (and I am assuming that you are), then you may have seen or made a "pencil line" in a bar of soap.

I was new to all of this pencil line stuff until recently. I had seen it done, but had never tried it myself. What is a "pencil line"? See the thin brown line between the two layers of my soap? That's a pencil line. Such lines are made by dusting a layer of mica, cocoa powder, poppy seeds, ground spices, ground coffee, charcoal powder, etc., in between soap pours. When the bars are cut, the line runs through the width of the soap, looking like it was drawn with a pencil.

One of my mom's favorite soaps is scented with a blend of eucalyptus and clove essential oils. When my folks came to visit last month, I gave her the last of my Eucalyptus Clove soap. Knowing how much she likes it, I made some more since I was plumb out. I figured it would also be a good time to try out the pencil line.

Because this was my first time playing with this technique, I kept things simple and did not color my soap or try to do anything too artsy so I could focus just on the pencil line. I thought about using ground cloves for my line, but decided against it, worried that it might be too scratchy or possibly a skin irritant. So I used some Cappuccino mica instead.

I made my batch of soap as usual and brought it to a medium-thick trace. I poured about half of the soap into my mold and then scooped a bit of mica into a tea infuser. (Any small sieve will also work.) To make the pencil line, I gently tapped the side of the infuser while moving it over the soap, creating a thin layer of mica. (Take care not to make too thick of a layer - the soap can separate if too much mica or powder is used. You just want to barely cover the surface of the soap.)

Dusting soap layer with mica (l); soap with a thin layer of mica (r)
After tapping out a layer of mica, the sides of my mold were sullied. I wiped the inside of my liner with a paper towel to clean it up. Otherwise, I would have ended up with splotches of mica all over the outside of my soap when I poured the next layer.

Wiping mold clean
(You probably noticed that I'm not wearing my safety gloves in the photos above. I confess that I did take my gloves off to tap out the mica line and to wipe my mold clean - I needed precision for those parts of the task, and my gloves give me big clumsy oaf hands. After I was done wiping my liner clean, my gloves went right back on.)

By the time I was done fooling around with the mica, the remaining soap in my mixing bowl had set up quite a bit and was thick. The first layer was poured at a fairly heavy trace, so I felt confident it could support the next layer. I poured the second layer over the back of a spoon so that the soap wouldn't break through the first layer, disturbing my mica line.

Pouring the rest of the soap over the back of a spoon
When I was done pouring, I tapped the mold on the countertop a few times to work out any air bubbles, covered the top of the soap with cling wrap to prevent ash, and insulated the mold so the soap could gel.

A few days later, it was time to cut. Here's a tip for cutting soaps with a pencil line - turn the soap onto its side and then cut it. If you cut top-to-bottom, you'll drag your line through the soap. Cutting the soap on its side keeps the line nice and crisp. And also wipe your blade clean after every cut. (This tip also works if you've got something like calendula, oatmeal, seeds, jojoba beads or whatever sprinkled on top of your soap. Ever cut your soap and had the stuff on your decorated tops drag through the soap, making grooves? Try the side-cut to avoid that.)

Cutting proved trickier than I was expecting. My soap mold has handy-dandy cutting notches built into it so I can make standard cuts, but my soap was too tall to fit inside my mold on its side. Lining up my cutter with the grooves from high up was imprecise, and because my cutter has a thick wooden handle, it wouldn't cut all the way through the soap anyway.

So, I took the soap out of the mold so I could line it up with the edge of the mold and the cutting notches. I used my cutter to mark where to cut and then did my best to make a straight slice with a chef's knife. I am the worst at freehand cutting, but I did okay with my notches marked off. The bars aren't as uniform as I would like, but they're not bad.

And how thrilled was I that the soap didn't separate when I cut it? Very, that's how. I worried I was a bit heavy-handed with the mica in parts, but I guess I did all right.

The pencil line technique is definitely something I want to play with again. I want to experiment with bringing the line higher up the soap. And while I like how straight my line turned out, I rather enjoy some of the soaps I've seen with imperfect pencil lines - lines that slope a bit or have a couple of small ridges in them. Perhaps I need to work some texture into the soap layer before dusting the line to achieve that effect.


Do you like pencil lines? Ever made one? What are some of your tips? Do you like perfectly straight lines, or do you like lines with a bit more character?

Sunday, April 1, 2012

The Dreaded Soda Ash

Gingersnap bars with heavy ash
If you make soap, you've probably had a few batches develop a whitish powdery layer on the tops. If you buy handmade soap, you may have seen this sort of thing. What is that stuff?

It's ... dah, dah, daaaah! ... soda ash.

What is soda ash? Conventional wisdom states that soda ash is sodium carbonate, which results from sodium hydroxide (lye) reacting with carbon dioxide in the air.

There may be other explanations for this phenomenon, though. In her book "The Soapmaker's Companion," Susan Miller Cavitch suggests that the powdery substance may just be dried soap. Glycerin, a natural by-product of the soapmaking process, attracts moisture from the air. Cavitch theorizes that the soap molecules closest to the surrounding air draw in moisture and then dry, forming tiny crystals. Her theory has been tested by a chemist, who could find no trace of sodium carbonate in the ash on her bars.

Beer soap with soda ash
Another idea is that soda ash could be minerals from the water in the soap collecting on the surface. This is one more reason to use distilled water for soapmaking, although I always use distilled water and still sometimes experience heavy ash. I have also experienced ash using beer in place of water.

Many factors can influence whether or not ash will form: temperature, batch size, fragrance or essential oils, humidity, soap density, or the soap recipe itself.

The origins of soda ash may be somewhat of a mystery, but one thing we can agree on is that it is harmless. (A thick, crumbly crust is another story - such a thing as that probably indicates lye-heavy soap.)

I think another thing that most of us soapmakers can agree on is that it is a total pain in the ash.

So, now that you kinda-sorta-not-really know where soda ash comes from, how can you prevent it from happening? I sometimes gently place a sheet of plastic cling wrap over the top of my soap after pouring it into the mold to prevent the surface from coming in contact with the air. This is fine if your tops are flat, but it doesn't work so well if you have textured tops. Another thing you can try is liberally spritzing the top of the soap with 91% rubbing alcohol after pouring.

Some folks don't mind ash. Soapmakers sometimes embrace it as part of the process and feel that it lends a rustic handmade charm to the soap. And soda ash tends to just wash off the first time anyone uses the soap, so it needn't be a huge concern to the soapmaker or the customer.

But it's just not pretty. And to the untrained eye, it can even look like mold or fungus (which it's totally not).

So let's say that you don't want soda ash. Let's also say that you get some despite your best efforts to avoid it. How can you get rid of soda ash once you get it?

This video by Soaping101 explains what soda ash is and offers up four methods for getting rid of it - alcohol, water, glycerin, and steam:


In the video, Soaping101 tries all four methods: spritzing the finished soap with 91% rubbing alcohol, dunking the soap in water, painting the soap with a bit of glycerin and colorant, and steaming the ash away. The conclusion was that while all methods removed some of the ash, steaming seemed to be the best bet.

Remember the photo of my Gingersnap soaps at the beginning of this post? I made that batch in September and it developed heavy soda ash. I had a couple of bars leftover and had never taken the time to try to remove the ash. The soap I make is just for me and my family, so I wasn't too worried about getting rid of it. A while back, someone on one of the soapmaking forums I belong to mentioned using steam to get rid of soda ash. Intrigued, I poked around the interwebs a bit more and found Soaping101's video. I liked the idea of using steam. Sure, you can slice the ash off, but then you mar the top (and waste a bit of soap). Rinsing with water can also mess up the tops. But a quick steaming would get into the nooks and crannies and it wouldn't interfere with the soap, which is great for textured tops, fancy peaks, or tops sprinkled with oats or seeds.

Since these Gingersnap bars had such heavy ash, I thought they would be good candidates for a blog feature and I decided to give the steaming method a try.

Holding bar over steam (l); After steaming (r)
All I did was simmer some water in a pot on my stove and then hold the soap over the steam. (The soap can get a little slippery, so I held it with a paper towel.) You could also use a tea kettle or a clothes steamer, whatever steam-errific thing you want. After a few seconds, the tops of the soaps looked a bit wet and the ash seemed to disappear. I let the bars dry on my curing rack for a few hours. Several days later, the soda ash was still gone.


(You may be wondering what the deal is with the yellowish parts in the photos above. I tried to swirl some gold-colored soap into the tops, but it didn't really work. I think I fiddled with it too much. I also wanted textured peaks, which didn't really work either. I still have the hardest time with that.)

So, I think in the future I will use the steam method to get rid of soda ash. It's quick, easy, and effective and it won't screw up the soaps.

Got any soda ash woes, my soapy friends? Does ash bother you as either a soapmaker or a customer? How do you like to get rid of it? Or do you prefer to just roll with the ash and keep it?

Wednesday, March 21, 2012

Oatmeal, Milk, and Honey Soap

My Oatmeal, Milk, and Honey soap
I have been wanting to make goat's milk soap for a while now, so a couple of weeks ago I decided to give it a whirl. I have used goat's milk soap made by other soapmakers, and I love the rich, creamy lather.

Usually I use distilled water for the liquid portion of my recipe, but many liquids can be used instead - beer, wine, tea, milks, fruit or vegetable juices and purees, etc. I substituted the entire water portion of my recipe with fresh goat's milk.

Honestly, I was a bit afraid to try goat's milk soapmaking before now because I had heard that it can be a temperamental process and requires more experience. After 15 months of making cold process soaps, I felt I had enough batches of regular soap under my belt to give goat's milk soap a try.

Making goat's milk soap does require some preparation in advance. Milks contain natural sugars, which can make the lye solution or the soap overheat. Ever curdled milk on your stovetop? Blech. Scorched milk-lye solution turns orange-brown and smells horrid; also, the lye can bubble up and volcano, which is not an ideal situation. Overheated soap can crack, separate into an oily mess, or become a lumpy disaster commonly referred to as "alien brains." To avoid overheating, it is best to freeze the goat's milk, add the lye very slowly, and keep your oils cool.

Frozen goat's milk
The day before I was planning to make my soap, I took out my scale and measured the amount of goat's milk I would need for the batch. I poured the measured milk into a plastic baggie so I could lay it flat in my freezer. (I froze the rest of the milk like this, too, since I pretty much stick to the same recipe and use the same amount of liquid each time.)

On soapmaking day, I took the milk out of the freezer and let it sit on the counter to thaw a bit while I set up my work space and got my oils and additives ready.

Because I was going to use an Oatmeal, Milk, and Honey fragrance oil, I decided to add honey and ground oats to my goat's milk soap, too. I bought a coffee grinder just for soapmaking, and I used it to grind up my oats. (The oats were the regular old-fashioned oats - quick-cooking oats can go mushy in soap. I used one Tablespoon of oats per pound of oils.) I dissolved my honey in a bit of warm distilled water to make it more fluid. (I used two teaspoons of honey total for two pounds of oils, mixed with one Tablespoon of warm distilled water.)
Grinding oats (1 Tbsp oats per pound of oils); ground oats and honey (1 tsp honey per pound of oils)
Once my oils were heated and combined and my additives were ready, I got to work on my milk-lye solution. I added my slushy/frozen goat's milk to my lye pitcher, breaking the frozen milk into chunks as I went, and then set the pitcher in an ice bath that was waiting for me in the sink. (Wondering why I make my ice bath in a dishpan instead of just using the sink basin? Well, the drain stopper for the sink has gone disappearin'. I've bought two replacement stoppers, neither of which worked out. I figured it was cheaper and easier to just get a dishpan and be done with it.) Then I gradually added my lye to the milk. I sprinkled some lye flakes on the milk, stirred for a bit, added some more lye, stirred for a bit, etc., until I had added all of my lye. Then I kept stirring the solution in the ice bath until the milk was melted and the lye was fully dissolved. I monitored the temperature and made sure that the lye solution never got hotter than 100 degrees Fahrenheit. The milk stayed a nice creamy yellow color.
Frozen goat's milk in lye pitcher (l); goat's milk-lye solution (r)
I was quite pleased with myself - my milk-lye had stayed cool and it hadn't changed color much. I did a temperature check on my oils; they were around 110 degrees, about 15 degrees warmer than I wanted them to be. So I took the milk-lye solution out of the ice bath and replaced it with my bowl of oils so I could cool them down faster.

That's when things got interesting.

During the few minutes I was stirring my oils in the ice bath, my milk-lye solution thickened up to a pudding-like consistency! I am kicking myself now for not taking a picture, but honestly I was so freaked out that all I could think to do was to hurry up and get it into the oils before it set up any further. I quickly added my fragrance oil and honey to my oils and then spooned/scraped my lye solution into the oils. After giving everything a buzz with the stick blender, the soap smoothed out and behaved beautifully, just like a perfect batch. After reaching a medium trace, I stirred my ground oats in with a spatula and then poured my soap into my lined mold.
Adding ground oats at trace (l); pouring soap into mold (r)
So what was the deal with the pudding-like lye solution? I consulted my friends at a couple of soap forums I belong to and the consensus seemed to be that the lye had begun saponifying the fats in the milk, which made it thicken up. I had never heard of this phenomenon before. No one had ever mentioned it in anything I had ever read, and none of the videos I watched on making goat's milk soap featured pudding lye. But after some discussion, it seems that this is fairly common when working with milks. Good to know for next time.

Gel phase! See how it's getting hot and gelatinous in the center?
I decided to let my goat's milk soap go through gel phase, which occurs when the soap heats up and becomes gelatinous first in the middle and then all the way out to the edges. Some soapmakers choose to avoid gel phase by popping the soap into the refrigerator or freezer after pouring it into the mold. Ungelled soaps tend to retain a lighter color, and the fridge keeps the soap from overheating. I usually gel my soaps, though - I like the texture of gelled soaps, and I'd rather have a darker gelled soap than a partially gelled soap. Partial gelling leaves a dark circle in the middle of the soap - totally harmless, but not pretty. I insulated with a single towel layer and checked the soap frequently to make sure it wasn't overheating. Once I saw that it had gelled completely to the edges, I removed the towel and the lid of the mold.

Cutting the soap
A few days later, I cut the soaps. Another thing about goat's milk soap is that it can sometimes smell a bit like ammonia for the first few days, especially if soaping temperatures are too warm. I really didn't notice too much of an ammonia smell. Maybe slightly funky, but nothing significant. When the ammonia smell does occur, it usually cures out within a few days.

The soaps are pretty dark, partly because they gelled and partly because of the fragrance oil, which discolors brown, and the honey.

I can't wait to try this one out! I think this soap will be extra nice with the added honey and oats. And the Oatmeal, Milk, and Honey fragrance is one of my favorites - slightly sweet, warm, and toasty. I still have to wait several weeks for the soap to cure before I can use it. Waiting is the hardest part of soapmaking!

I'm excited to make my own goat's milk soaps since all of the ones I've ever tried have been a real treat. The lather is always so soft, bubbly, and creamy, and it feels great on the skin. One of my favorites was a bar I picked up at a farmer's market that was made with goat's milk AND beer. Talk about great lather! I will definitely have to try that someday in my own soap kitchen.

Are you a fan of goat's milk soaps? Do you have a favorite goat's milk soap that you enjoy making or using? What is your favorite thing about goat's milk soaps? Any interesting stories or mishaps?

Tell me all the goaty details!